Showing posts with label Cake Pops. Show all posts

Monday, February 9, 2015

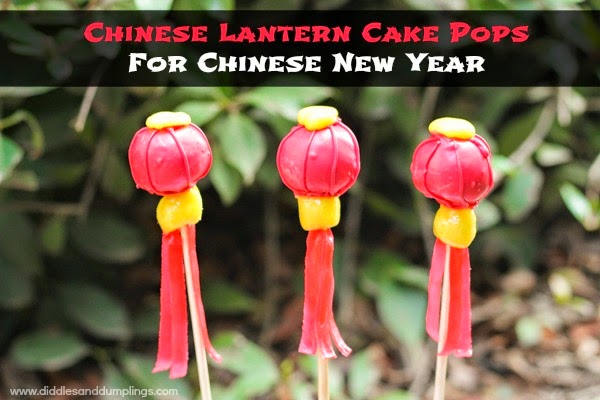
Chinese Lantern Cake Pops for Chinese New Year!

This shop has been compensated by Collective Bias, Inc. and its advertiser. All opinions are mine alone. #NewYearFortune #CollectiveBias


My little family is a family of tradition, that's for sure. We love celebrating different holidays and events throughout the year and we especially love coming up with delicious ways to make them memorable! This year, since Chinese New Year is just around the corner (February 19th!) my daughter and I decided that we should celebrate by making some adorable Chinese Lantern cake pops!


The first thing we did was head to Walmart to grab our cake pop supplies. While we were there we headed down the frozen aisle to the Family Meals section and grabbed a box of Tai Pei® Mini Vegetable Spring rolls and a box of Pork Egg Rolls. We definitely needed some traditional, authentic Chinese foods for our celebration!  We totally had an 'ah-ha!' moment and decided that even though the egg rolls and spring rolls come with their own dipping sauce, we should also whip up a couple of new dipping sauces for them (a sweet ginger sauce and a mustard sauce -- See below for recipes!) We love sauces in this house.

Once we were home we started on our cake pops...

Chinese Lantern Cake Pop Tutorial:

Materials Needed:

  • 1 baked 9"x13" yellow cake
  • 1 container vanilla frosting
  • 3 cups Red Chocolate Melting Disks
  • 3 tablespoons Yellow Chocolate Melting Disks
  • 1 roll fruity ribbon (the kind you put in your kids' lunches)
  • 16 square yellow taffy candies
  • Cake pop sticks or wooden skewers


Step 1: Take 12 of the yellow taffy candies and roll them into balls, then flatten slightly. Use a wooden skewer to poke a hole in the center. Basically, you're making a taffy doughnut. 

Step 2: Cut a 2" long piece of fruity ribbon, then cut ribbon into thirds (mine already came pre-cut into 3 equal ribbons.)

Step 3: Use a skewer to poke the ends of the fruit ribbon into the center of the taffy candy.

Step 4: Place all finished taffy rounds on a plate or parchment paper so the side facing down will become flat.

Step 5: Cut the remaining 4 taffy candies into thirds, roll into balls and flatten slightly.

Step 6: Place half of the baked cake into a mixing bowl and add 4 tablespoons of vanilla frosting. Mix well until all frosting is incorporated.


Step 7: Divide cake mixture and roll into 1" balls. Dip the end of your cake pop stick or skewer into your melted yellow chocolate and push into the center of each ball. Place in freezer for about 10 minutes, or until balls are slightly firm.

Step 8: Place red melting disks into a microwave-safe mug and melt, stirring every 30 seconds. 

Step 9: Dip each chilled cake ball into the melted chocolate.

Step 10: Poke the bottom of each stick into a block of styrofoam or in a cake pop stand to harden.

Step 11: Place remaining red chocolate into a ziptop bag and pipe lines around the pop going from the top of the cake pop all the way down to the stick.

Step 12: Place a squirt of chocolate on the top of the cake pop and add your small round piece of taffy. Place a small amount of chocolate at the base of the cake pop and slide the larger taffy piece (with ribbons dangling down) up to adhere to the base of the cake pop. 

Makes 12 Chinese Lantern Cake Pops


Now, sit back and admire your adorable Chinese Lantern Cake Pops! 

While we were making our cake pops we talked about the traditions of Chinese New Year and learned a few new things...

This year is the year of the sheep! 

Chinese New Year (Lunar New Year) is a holiday centered around wishing 'good fortune' to all. Many give 'red envelope' gifts (money) to friends and loved ones.

Did you know that Chinese Lantern Festivals are held around the world to mark the end of the Chinese New Year celebrations?  In Hong Kong it's pretty much the equivalent to Valentine's Day!

Also, a lot of the lanterns, nowadays, are much more intricate than they used to be. They have lanterns shaped like animals! You should definitely look online for some pictures and videos as they are super awesome to see!


The next step in our celebration was to heat up our Tai Pei® egg rolls and spring rolls!


Onto the baking sheet you go!


While our snacks were cooking away we whipped up our mustard dipping sauce and our sweet ginger sauce!


It's great being able to have authentic, restaurant-quality egg rolls at home and they really added that special touch to our Chinese New Year celebration!

My hubby loved the mustard dipping sauce and I was head-over-heels for the sweet ginger sauce! Yum.


After we ate our egg rolls we went outside and released our "Chinese lanterns." 


And by 'released' I obviously meant 'ate.' We ate them.


For a little extra fun you can use your phone to scan the QR Code on the side of your Tai Pei® snacks and get your very own fortune! Chinese New Year is all about good fortune (luck) so this was a great little surprise!

The Chinese New Year app on Facebook includes a Red Envelope Tab that features coupons for their delicious products (until they run out!) So, make sure to download yours!

You can visit Tai Pei® on Facebook, Twitter and Pinterest for more delicious Chinese New Year inspiration!

---------------------------------------------------

Mustard Dipping Sauce:

Ingredients:
  • 1/3 cup dijon mustard
  • 2 tablespoons rice vinegar
  • 1 tablespoon brown sugar
  • 1 teaspoon sesame oil
  • 1/4 teaspoon Chinese five spice
  • 1 tablespoon hot water
Directions:

Combine all ingredients in a small bowl and mix until sugar has melted. You can serve warm or place in the refrigerator and chill until ready to serve.


Sweet Ginger Sauce:

Ingredients: 
  • 1/2 cup rice vinegar
  • 1 teaspoon freshly grated ginger
  • 1/4 cup + 1 tablespoon brown sugar 
  • 1 clove garlic, grated
  • 1 teaspoon soy
  • 1/4 teaspoon red chili flake
  • 5 tablespoons cold water
  • 1 tablespoon cornstarch


Directions:

Place all ingredients in a small saucepan and heat over medium until thickened. Allow mixture to cool slightly. Serve warm.


Sunday, January 27, 2013

Gnome Cake Pops


As I was sitting here looking through hundreds and hundreds of photos of my adorable 6-year-old daughter, I came across the pictures of her latest birthday. She was so set on a garden themed party this last year and she had everything planned out exactly how she wanted it. One of the best things about my little girl is that she really, really loves planning things! Especially holidays and parties. She loves to think of creative ideas and she really loves to see them come together. She asked me and asked me if I could make her some gnome cake pops for her party and I was super excited for the challenge!  I actually had a lot of fun making these cute little garden gnome cake pops and I even modeled them after the gnome I created for her birthday party invitation! 

To make them, I started with a big ball of cake and used it to shape the head/body/arms. It kind of looked like a star with a rounded top tip. I used bugles for the hat and the rest of the design was done with dyed white chocolate! They were actually pretty easy to make! 

I thought I would put them up on the blog for anyone looking for cute inspiration for a garden birthday party. I know that when I'm getting ready for a party I like to spend hours upon hours searching for cute ideas to fit the theme! I hope these cute little guys will help anyone looking to throw their children a fun, colorful garden theme party!

Friday, May 25, 2012

Cake Pops

Cake Pops

Here are some of the cake pops I've made:

Leprechaun Cake Pops (remember these guys??)

Baseball Cake Pops

Bikini Body

Cows & Pigs

Fuzzy Chicks

Pepsi Themed


Tiki Heads

Quails

Friday, March 16, 2012

Leprechaun Cake Pops


Tomorrow is St. Patrick's Day as I'm sure you already know. What you may not know is that today I am bringing these Leprechaun Cake Pops to my daughter's class! I am so thrilled with how cute they turned out! I had a vision for them and they turned out exactly how I'd imagined (better actually!) This was only my second attempt at making cake pops and it seriously went so smoothly. By smoothly I mean that:

1. The cake balls actually stayed on the sticks and didn't fall off from being too heavy.

2. When I dipped them in chocolate, I did my little *dip, twirl, pull out* method and it was flawless.

3. My chocolate did not seize at any point from me accidentally getting a drop of water in it. 

4. I did not panic, cry or throw any cake or chocolate.

All in all, this was a very successful project! I watched Bakerella's Cake Pop Tutorial Video to give me some confidence and some much-needed support. Thanks Bakerella!!

Due to the fact that these little guys were just too darn cute, I just kept taking pictures:


And here's one more of them all packaged up and ready to go to their new homes (The stomachs of 23 little kindergarten children that will take one look at it and pop it in their mouths). 


How to make Leprechaun Cake Pops:

Ingredients and materials:

For cake pop base:

  • 1 Box Yellow cake mix
  • 1 Can vanilla frosting
  • eggs (the amount your cake mix calls for)
  • oil (the amount your cake mix calls for)
  • water (the amount your cake mix calls for)
  • white melting disks (I used like 3 pounds, just in case I had any problems.)
  • 9"x13" cake pan
  • Lollipop sticks
  • Mug or measuring cup to dip


For hair/hat/details:

  • White Melting Disks
  • Orange candy coloring
  • Green candy coloring
  • Black candy coloring
  • Mini Marshmallows
  • Rainbow Chip Crunch Sprinkles (or any other yellow sprinkle you might have)
  • 2-3 #2 Decorating Tips
  • Double boiler
  • Decorating bags
  • toothpicks

Instructions:

Bake your cake according to package directions. Allow it to cool, then, In a large bowl crumble it into tiny little pieces. Add in some frosting (I used a little over 1/2 a can of it) and mix it all together. You don't want it to be too gooey. 

Roll mixture into balls. I'd say a large, heaping tablespoon full is about right. You should be able to get somewhere around 35-40 balls (depending on how big or small you make them) Place on parchment paper and into freezer for about 30 minutes or so, or until they become somewhat firm, but not icy.

Melt about 2-3 cups of white chocolate in a double boiler. Pour it in something like a mug or even a measuring cup (for better dippage!) Place a tiny bit of orange dye into the mug and mix until you get the perfect shade for your Leprechaun's skin.

Remove balls from freezer. Dip the tip of one lollipop stick into the skin-colored chocolate and insert into cake ball about half-way.    Place on parchment paper with the stick up in the air. Repeat with all cake balls. 

Grab one of the cake pops and dip it into the chocolate. Move it around (just a tiny bit!) to make sure it's all covered, then remove it! Don't spend too much time in the chocolate or your cake ball will begin to melt and then it will fall into the chocolate and you will cry (trust me on this.) Place cake pop back on the parchment paper (once again, with the lollipop sticks in the air.) You want them to get slightly flat on top so that the hat will sit on there perfectly! :)

While they are drying you can take about 3/4 cup of your melted white chocolate and tint it green. 

Place whole (unmelted) white chocolate melting disks onto parchment paper (this is the hat base, so use the same amount of disks as leprechauns!) Take a mini marshmallow, dip only the bottom into the green chocolate and place it on top of the melting disk. Repeat with all melting disks. Once they have hardened, insert a toothpick into the top of the marshmallow and dip the entire "hat" into the green chocolate (do it quick so the chocolate disk doesn't melt!) Place it back on parchment paper and allow to harden.

Take about a cup of melted chocolate and tint it orange. Place the orange chocolate into a decorating bag fitted with a #2 tip. Pipe some hair on the flattened part of the cake pop and make a beard, using swirling motions to make it look more textured. Lay them on their sides on the parchment paper to harden.

Take about 1/8 cup of melted chocolate and tint it black. Using another decorating bag fitted with a #2 tip, pipe a black rim on the hat around the place where the marshmallow meets the melting disk. While it is still wet, place a yellow candy on on the black chocolate.

Using the same bag filled with black chocolate, make tiny black dots for the eyes.

Place the same chocolate you used to dip the cake pop (the skin colored chocolate) into another bag fitted with a #2 tip. Use this to pipe bigger dots for the noses.

Using the orange chocolate, pipe a little more hair on the very top of the cake pop and quickly adhere hats. 

You're done! You should now have a whole bunch of extremely adorable Leprechaun Cake Pops!


TidyMom 
Related Posts Plugin for WordPress, Blogger...