Showing posts with label desserts. Show all posts

Tuesday, April 26, 2016

Dark Chocolate Coconut Almond Crunch


The secret to a happy life, in my opinion, is chocolate. There are very few things that can give me the pure satisfaction that chocolate can. It can also take away any sadness or anger I may be feeling and instantly put me in a great mood. Pair that chocolate with some salty nuts and crunchy, buttery toffee and you've got yourself a winning combination. 

Now, throw a little toasted coconut on top and you've officially arrived. This is as good as it gets.


There's something really satisfying about chopping up chocolate. Give me a sharp knife and a big hunk of dark chocolate and I'll be a happy camper.


Hello, beautiful chocolate. Hi! You're so pretty. Yes you are.


Now, a sprinkling of pixie dust. I mean coconut. And now you have yourself the perfect little treat that will satisfy your sweet tooth. And your salty tooth, if that's a thing. Which it's not. But, it should be.

Enjoy! But try not to eat them all at once... Like I did. 


Dark Chocolate Almond Crunch:

Ingredients:
  • 1/3 cup white sugar
  • 2 tablespoons salted butter
  • 1 cup raw almonds
  • 1- 1/2 cups chopped dark chocolate
  • 1 tablespoon sea salt
  • 1 tablespoon unsweetened coconut


Directions:

Place a skillet over medium heat and heat almonds, while tossing for 1-2 minutes or until they're golden brown and smell nice and toasty. Set aside. Place coconut in the same pan and toss until golden brown, then remove from heat and set aside.

Place sugar and butter in a small saucepan over low heat. Once mixture melts, cook for 6-8 minutes, or until it's beginning to thicken and turn a rich caramel color. Quickly toss almonds to the pan and coat with mixture. Place tablespoons of the nut mixture on a baking sheet lined with parchment paper and allow to harden.

While nuts are cooling, melt chocolate over a double boiler until smooth and shiny. Spoon or drizzle chocolate over clusters and sprinkle with toasted coconut and sea salt. 

Makes about 16 clusters


Monday, January 26, 2015

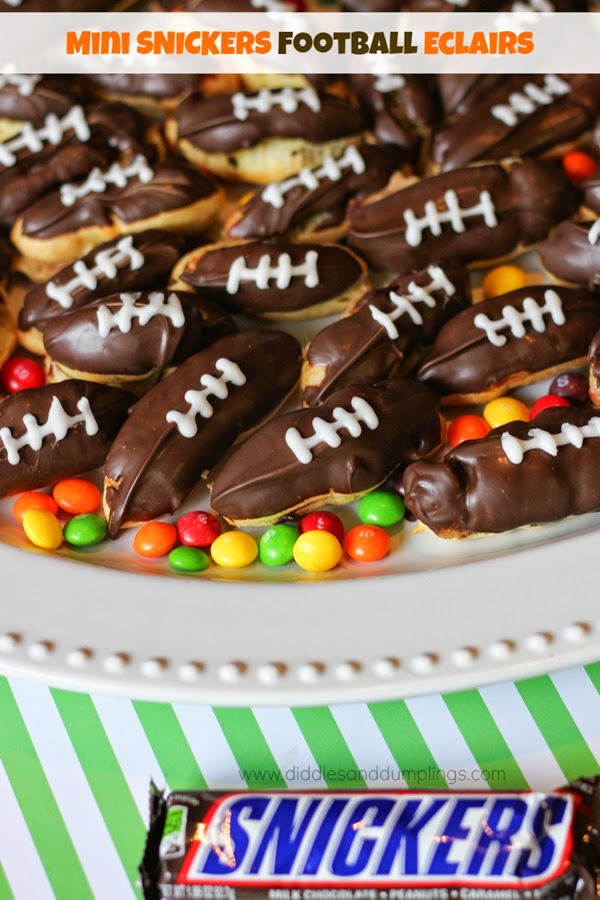
Mini SNICKERS Football Eclairs #BigGameTreats

This shop has been compensated by Collective Bias, Inc and its advertiser. All opinions are mine alone. #CollectiveBias #BigGameTreats


Football season has become an extremely fun time of the year for our family. We love tuning in the games (especially the big game) and cheering on our favorite team while enjoying some yummy finger foods! Okay, so It's true that I do love any excuse to make a bunch of snacks and will jump at the chance, but, I have really embraced my love of Football and have been enjoying watching the games with my family! You will find me jumping up and down, yelling at the TV and screeching when my team scores a touchdown. I am very invested.


You definitely won't find me in the kitchen for very long during the Big Game... which is why I like to make sure all my food is prepared ahead of time and completely ready to serve once it starts. I usually start planning my menu about a month in advance and I try to make sure to cover all the basic Football food groups: Cheesy, Crispy, Gooey and my favorite group of all... satisfyingly sweet.


This year, I'm going to be making these adorable Mini SNICKERS® Football Eclairs to cover the "satisfyingly sweet" group. Eclairs have always been one of my favorite, scratch that... They've always been my favorite dessert since I was a little girl. My family and I would often travel the central coast and there was one special bakery where I would always, always, always get a chocolate eclair. I didn't eat any other chocolate eclairs throughout the year... just that one. But, i've decided, now that i'm older, wiser and able to create delicious food on my own, I'm going to tackle the eclair and make it my own (did you get that football reference?!) 

So, of course, the first thing I had to do was head to Walmart and grab all my delicious supplies! I stopped in on the candy aisle to grab my 6-pack of SNICKERS. 4 for the recipe and 2 for... eating! To give me energy to make the recipe, of course. I also grabbed a bag of Skittles®... you'll see why in a bit :)


First off, let's start by making an adorable "Game On" Football Bunting to display over your eclairs. Shall we?

“Game On” Football Bunting Tutorial

Supplies: 
1 12"x12" sheet green paper, a few scrap pieces of brown paper and white paper, white ribbon, 2 wooden skewers, glue, scissors

Step 1: Take a piece of 12”x12” scrapbook paper and cut off two 1-1’/4 strips from it. Fold strips in half and then in half again, to form 4 equal pieces. Repeat with other strip so you end up with 8 pieces.

Step 2: Cut off corners (as demonstrated above) to resemble a trapezoid. 

Step 3: Print out the letters to make the words “GAME ON.” Cut out letters and paste onto one side of your trapezoid. Use brown paper to cut out two football shapes and use small pieces of white paper or a white pen to create laces. Paste onto remaining 2 pieces.

Step 4: Lay out your letters and the footballs on each side of the letters, cover the inside of the green paper with glue. 

Step 5: Place in your ribbon, close and seal tightly.

Step 6: Tie the ends of your ribbon onto 2 wooden skewers.

And you're done!! :)


Now it's time to make the dessert! Gotta unwrap that chocolate...


Chop, chop, chop...


Mixing it into the pastry cream before adding it back to the pot to melt...


Mixing up the dough for the eclairs.


The piping was fun and easy thanks to my hubby... he got me this cake decorating tool for Christmas (like 2 years ago) and I somehow completely forgot about it until today!


Straight outta the oven. Nice and puffy!


Filled and dipped in dark chocolate... Now we're cookin'!


I served these tasty little footballs up on a platter with Skittles to give it some color! You could also divide the Skittles into your team's colors and only use those! That would be super cute. But, I liked all the color they brought to the final product... Plus... wait until you see the bunting!


Isn't it so cute?? My hubby's small glasses filled with colorful Skittles made the perfect weight for the bunting! I couldn't love it more. Really, I couldn't.

Everything looks good enough to eat, don't you think?


So, when you're trying to think of that perfect dessert to serve up at this year's Big Game... whip up a batch of these tasty and adorable mini SNICKERS football eclairs and wow your guests! I promise they'll say "wow." How could they not?

--------------------------------------------------------------------------

Mini SNICKERS Football Eclairs: 

Ingredients:

Cream Puff Dough:
  • 1/2 cup milk
  • 1/2 cup water
  • 1 stick salted butter, cut into tablespoons
  • 1 tablespoon sugar
  • 1 cup flour
  • 4 eggs, room temperature
Pastry cream:
  • 2 cups milk
  • 1/2 cup sugar
  • 4 tablespoons cornstarch
  • 2 tablespoons butter
  • 1 teaspoon vanilla extract
  • 4 SNICKERS bars
  • 1 cup dark chocolate chips
  • 1 tablespoon vegetable oil
  • 1/4 cup  white chocolate chips

Directions:

Chop SNICKERS bars into very small pieces, or you can use a food processor.

Place milk, sugar and cornstarch in a medium saucepan and whisk. Turn on meat to medium and whisk until mixture thickens to the consistency of a thick salad dressing. Stir in chopped snickers and whisk until melted. Remove from heat and whisk in vanilla and butter. Place in bowl, cover with saran wrap and place in fridge to chill for at least 3 hours.

Preheat oven to 375 degrees.

Bring milk, water, butter, sugar and salt to a boil. Dump in the flour and stir continuously until dough becomes a ball. Transfer dough to a mixer and add in eggs, one at a time (make sure egg is incorporated before adding the next egg!) Your dough should be sticky and somewhat stiff. Place dough in a piping bag or a fun little cake decorating tool fitted with a round tip. Pipe “football shaped” (thin on the ends, thicker in the middle) lines about 2 inches long. You should be able to get between 32-36. 

Place into oven for 16-18 minutes, or until they are beginning to turn golden brown. Prop oven open slightly and bake for additional 5 minutes. Remove from oven and baking sheet to cool.

Cut each shell open on one side. Place pastry cream into pastry bag or tiptop bag and pipe into cooled shells. Place in the fridge until chilled, about 30 minutes. 

Meanwhile, in a microwave-safe bowl, heat oil and dark chocolate, stirring every 30 seconds, until chocolate is completely melted.

Dip chilled eclairs into chocolate and set on parchment paper or foil to harden. Once chocolate has hardened, melt the white chocolate chips and place into ziptop bag. Pipe laces onto the top of the eclairs to complete your football. Place in fridge and chill until ready to serve!


Makes about 32 mini chocolate footballs


Friday, February 28, 2014

Dr. Seuss Treats


My favorite part of my daughter being in school is being able to make cute, adorable treats for her to take and share with her class. I know this won't last forever, and there will come a time when she will be to embarrassed to bring leprechaun cake pops and Dr. Seuss cupcakes to school, so I'm going to take advantage of it while I can! Plus, by the time she's old enough to be "too cool" for those things, Corbin will be in school and I'll be able to do the same for him! This is why it's very important to have multiple children and have them significantly spaced apart.

Today, to celebrate his birthday, my daughter is having a Dr. Seuss Read-a-thon in her class and they will be spending the day reading lots of Dr. Seuss books! She also got to bring along a fluffy blanket and her pillow pet for lounging! Sounds like my kind of day! My sweet little daughter informed me after school yesterday that she told her teacher I would be bringing a special Dr. Seuss themed snack. Glad we had some time to talk about this and prepare beforehand. Not. Gotta love kids ;)


In my efforts to think of a treat that would be cute, sweet and encompass all that is Dr. Seuss, I decided to go with bright and colorful trix treats covered in blue chocolate, sprinkles and, of course, the fish from "1 fish, 2 fish..." I am very pleased with these cute and colorful little goodies and my daughter said "Don't even worry about whether my class will like these... they won't. They'll LOVE them!" So, it's safe to say that I feel pretty confident.

Zany Dr. Seuss Treats:

Ingredients:

12 cups trix cereal
5 tablespoons salted butter
10 ounce bag mini marshmallows
1 cup blue melting disks (or white melting disks dyed blue)
Rainbow sprinkles
Colorful fish gummies

Instructions:

Spray or lightly grease a 9"x13" baking dish.

In a large pot, heat butter until almost melted. Add mini marshmallows and cook, stirring frequently, until completely melted. Add trix cereal and combine well. Pour mixture into 9"x13" baking dish. Make sure mixture is packed tightly and allow it to cool. Once cool, cut into squares.

In a microwave safe bowl, melt chocolate disks in 30-second intervals until smooth. Drizzle over cooled treats, place a gummy fish on top and sprinkle with rainbow sprinkles!


Saturday, February 1, 2014

Easy Valentine Caramels


So... It's no secret that I love chocolate. I mean I looooove chocolate. Hubby and I have been dieting, err, "Eating better" lately and have only had a couple of cheat days so far. On those cheat days do you know what I eat? Chocolate.  I can't live without it's sweet, delicious chocolatey goodness...


I spent my morning trying to think of something cute I could make for Valentine's Day that hadn't already been done 1,000 times. I kept looking at my bag of See's Chocolate Chips and thinking that I just wanted to dig in and that, really, if I were to simply throw them in my mouth, that would be good enough. But, after I noticed some leftover caramels sitting up in my pantry and I saw my adorable heart-shaped sprinkles, I knew what had to be done...


Chocolate + Caramel = Amazing. Every. Time.


Look how pretty it is now that it's covered in chocolate. Chocolate makes everything pretty! It's almost Too easy!


The end result is an adorable pile of Valentine Caramels that will make anyone smile! They're cute, they're tasty and they're perfect for your Valentine!


Valentine Caramels Instructions:

Ingredients:

24 caramels, unwrapped
1 cup See's Candy Chocolate Chips
1/2 teaspoon vegetable oil
Large heart-shaped sprinkles

Instructions:

In a microwave-safe bowl, place chocolate chips and oil. Microwave at 30-second intervals, stiring frequenty, until chocolate is melted.

Using a fork, dip caramels in chocolate, remove and set on wax paper. Before they dry, place large heart sprinkles on all sides (except the bottom...)

Admire their cuteness. Wrap up in cute Valentine's Day packaging and give to a loved one, friend, neighbor, or anyone you want to get in good with ;)


Friday, December 13, 2013

Holiday Baking with Pompeian Grapeseed Oil: Chocolate Peanut Butter Cookie Cups


Christmas is just around the corner! Do those words make you squeal with delight or shriek with terror? For me, it's the squealing with delight part, mostly because I've gotten almost ALL of my Christmas gift shopping done! Whew! In between all the shopping and the shopping and the shopping I've managed to squeeze in a little baking time -- which is what really makes the holidays the holidays in my opinion! I was recently turned out to a great new product from Pompeian -- their grapeseed oil spray. It's perfect for holiday baking due to it's relatively high smoke point, and it's also got a great flavor! I've been using it in all of my baking this month and so far I'm completely in love! 


Today I decided I'd share a little recipe my daughter and I whipped up this week, Chocolate Peanut Butter Cookie Cups. They're a delightful little treat if you're going to have company or if you're just looking for something easy to share at work!


The spray is actually really fun to use! I found myself wanting to keep spraying and spraying because it looks so neat... but, I had to make myself stop... my pan was getting overly saturated.


You can see here that my pan was, in fact, heavily saturated. Oops. But, aren't they cute?! I think they're adorable... AND they taste like creamy peanut buttery goodness... with a nice chocolate accent!


So, you should probably head to the store right now to get the ingredients for these little cuties. My daughter says "They are the best things I have ever tasted in my whole entire life." She might be exaggerating just a tad bit, but at least she's enthusiastic, right?

Before you head to the store, make sure to print out this $1 coupon for your Pompeian Grapeseed Oil Spray!


Chocolate Peanut Butter Cookie Cups:

Ingredients:

1 bag sugar cookie mix
*butter, eggs, etc. according to package directions
1/4 cup brown sugar
2 tablespoons butter
3 tablespoons peanut butter
1-1/2 cups confectioners sugar
1-2 tablespoons milk or cream
About 1/4 cup semi-sweet chocolate chips
Pompeian Grapeseed Oil Spray

Instructions:

Preheat oven to 350 degrees.

Grease a mini muffin tin using Pompeian Grapeseed Oil Spray. Set aside.

Mix together contents of sugar cookie pouch, along with required amount of butter, eggs, etc. Roll dough into 28 balls. Press each ball into one of the mini muffin tins, leaving a large space in the center (for filling!). Bake in preheated oven according to package directions. Remove from oven and allow to cool.

In a mixing bowl, combine brown sugar and butter. Mix in peanut butter, then milk (or cream), followed by confectioners sugar. Beat on medium speed for 1 minute.

Once cookies have cooled, fill each cookie cup with the peanut butter mixture and top with chocolate chips.

Try not to eat too many, or you might find yourself in a sugar coma!

Makes 28 cookie cups.


-----------------------------------------------------------------------

Make sure to "Like" Pompeian on Facebook for recipes, news and more fun stuff!

For the chance to win a $200 gift card (which would be perfect for all your baking needs this season!) click here to enter.

**This is a sponsored post from Smiley360 and Pompeian. I was provided with a free item for review purposes. All thoughts and opinions are 100% my own.**

Tuesday, March 19, 2013

Hawaiian Party Desserts

As I was looking through old pictures, I ran across some awesome ones of a party that I helped my good friend Becky put together for her daughter's 6th Birthday! I figured that with summer coming up, and lots of Hawaiian themed parties being planned, it might be good to post some pictures of the adorable desserts we ended up making! We had so much fun putting it all together and in the end it came out super cute! It so makes me want to throw a luau party now...


Dessert table! (We didn't make the cake... but it sure looked amazing!)


A tray of super cute nutter butter/frosting sandals! The shells and starfish were made using a shell mold found at Michaels! The sandcastles were made by packing brown sugar into small sand castle molds (found at Dollar Tree!) They were one of my favorite details!


One more tray of sandals... just because ;)


Super cute hawaiian rainbow fruit kabobs! So colorful and festive! Oh, and healthy, too ;)


Beach cupcakes! Some had little beach chairs made from striped Zebra Gum... others had jawbreaker beach balls! Sand was made with ground up cookies! So cute.


Close-up of adorable cupcakes! ;)


And, of course... What hawaiian party would be complete without Tiki Head Cake Pops? I had so much fun making these little guys and they made a great centerpiece for the kids' tables!


And even though this isn't dessert related... I had to share it! We turned her daughter's playhouse into a Tiki Hut using rafia skirts! Isn't it adorable??


Linked To: Back For Seconds

Tuesday, May 15, 2012

Marshmallow Filled Buttermilk Mocha Cupcakes


Life has been kind of stressful lately and you know what makes me feel okay? Chocolate.

Unfortunately, the husband doesn't care for chocolate desserts, so I very rarely make anything involving chocolate... but, one day I was so angry with life that I decided to be crazy and make something as chocolately as I possibly could. The whole time I was making this dessert, I felt like I was taking out some of my anger on these little chocolatey beauties. With every mix, every pour, every squeeze, I felt a little better and I came to the realization that baking is both therapeutic and delicious.

The great thing about this recipe is that when you are rushed or not in the mood to "whisk together flour and baking powder" and "cream together butter and sugar," you can simply dump all the ingredients in a bowl and mix them together and it comes out juuuuust fine! I love recipes like that.

Do you know what else was wonderful about this recipe? I used canned frosting... and guess what? I liked it. It was the perfect fudgy addition and I didn't have powdered sugar covering my counters. Powdered sugar covering your counters when you're in a bad mood is not so fun.

What's that thing they always say? Oh yeah...

Stressed spelled backwards is Desserts.


Marshmallow Filled Buttermilk Mocha Cupcakes Recipe:   |Print Recipe|
2 cups flour
1 cup white sugar
1 cup brown sugar
3/4 cup hershey's cocoa powder
1/2 teaspoon salt
2 eggs (beaten)
1/2 cup vegetable oil
1 cup buttermilk
2 teaspoons baking soda
1 teaspoon baking powder
1 cup coffee (just use your leftover coffee from that morning!)
2-3 cups Small (Kraft) Jet Puffed Marshmallows
1 can (Duncan Hines) Chocolate Frosting

Preheat oven to 350 degrees.

Mix all ingrendients, except the frosting and marshmallows, in a large bowl. Mix until well combined and no lumps remain.

Fill 24 cupcake liners about 2/3 full and bake in preheated oven for 30-32 minutes.

Right when you remove cupcakes from the oven, poke a hole in the middle using a wooden spoon (or if you have one of those awesome little cupcake coring tools you can use that!)Rock the spoon back and fourth to clear out a little room in the center. Poke 5-6 small marshmallows right in the hole.

Allow cupcakes to cool, then pipe on a pretty little pile of fudgy frosting right in the center.

>Mandy‘s Recipe BoxPhotobucket>Addicted to Recipes Button, Page buttonWhat's cooking, love?Photobucket
Related Posts Plugin for WordPress, Blogger...